How to Crossfade Spotify Songs & Enable Seamless Transition
For all the users of Spotify who do not know yet, you can actually have Spotify crossfade songs with your account. The Spotify Crossfade feature can help you avoid the constant stopping of a song every time the previous one is about to end. Listening to your favorite Spotify music is indeed the best if there are no pauses or any interruptions encountered. All of us would surely want a smooth transition in between the songs that we are playing, so knowing about Spotify crossfade songs is actually an advantage for us.
With Spotify's crossfade songs feature, your music will never stop and will continuously play until you stop the songs, yourself. You are even allowed to adjust for how long the transition would last. So, to know more about the details and definition of this Spotify crossfade songs feature, where to find it, and how to make it work in your own set of playlists, this article will be tackling all the basic steps that you should know about the mentioned Spotify crossfade songs.
Article Content Part 1. What Does Crossfade Songs on Spotify Mean?Part 2. How to Enable Spotify Crossfade?Part 3. Best Songs to Crossfade on SpotifyPart 4. Summary
Part 1. What Does Crossfade Songs on Spotify Mean?
Have you ever been to a concert where the songs being played around the area are controlled by a DJ? If yes, have you noticed that there is no dead air experienced in between the songs? This method is actually called Crossfading. Crossfading of songs is the strategy used by DJs in order to avoid the cutting of sounds every time the song that is currently being played is about to end and then a new song is about to start.
To make it simple, it is the fading out of the former track and the fading in of the upcoming sound. And if you are using the Spotify Music app for quite a long time now, then you should know that you can actually have Spotify crossfade songs as well.
One of the main reasons why DJs do this strategy of crossfading the songs is obviously not to kill the wild energy and the strong vibe that was felt by the audience just because the former song is about to end. If you were part of the audience, this actually kind of feels weird and not comfortable right?
What’s the Best Crossfade Time on Spotify?
If you, as a DJ, don’t want to avoid this embarrassment, then you must know the best crossfade times on Spotify. Generally speaking when listening to music on personal devices, an optimal crossfade time of 5 to 6 seconds is ideal. However, different music genres may benefit from different crossfade durations. For example, genres such as electronic music or dance music may benefit from longer crossfade durations (6 to 12 seconds) to maintain a seamless flow, while shorter durations (1 to 5 seconds) may be more appropriate for pop or rock, etc. school. The optimal crossfade timing therefore depends on the user's personal preference.
Part 2. How to Enable Spotify Crossfade?
It was already mentioned a while ago that you can also have Spotify crossfade songs, but since it is not activated in Spotify by default because of reason that it might ruin the transition of a certain album, you have to activate it yourself. So, I have here below the steps on how you can have Spotify crossfade songs through your PC and mobile phone.
How to Enable Spotify Crossfade on Your Computer
Step 1. The first thing that you have to do is to open the installed Spotify app on your computer. Once the app has opened already, take a look at the upper right part of your screen and notice the arrow pointing downwards right next to your username. Click on it.
Step 2. From the set of options shown next, click on “Settings”.

Step 3. On the Settings section, scroll up to the last part of your screen until you see the button “Show Advanced Settings”.
Step 4. After doing so, under the Playback section, switch the button beside “Crossfade Songs” to enable it and have your own Spotify crossfade songs.
Step 5. here is actually a slider right next to the words “Crossfade Songs”. Slide it based on the duration you want the crossfading of two songs to last. You can slide from 0 to 12 seconds.
How to Enable Spotify Crossfade on Your Smartphone
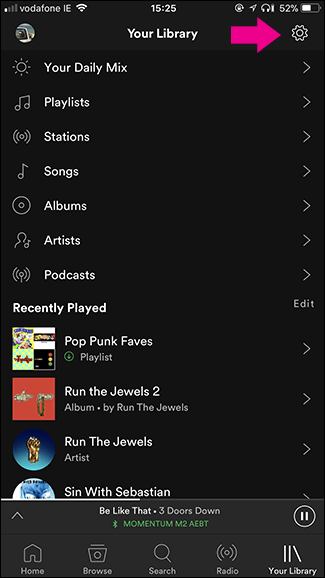
Step 1. The first step to do is to have the Spotify app opened on your mobile phone. Right after that, select the tab of “Your Library” which is located at the very bottom of your home screen.
Step 2. Now, take a look at the upper right part of your screen and notice the gear icon which represents the settings.
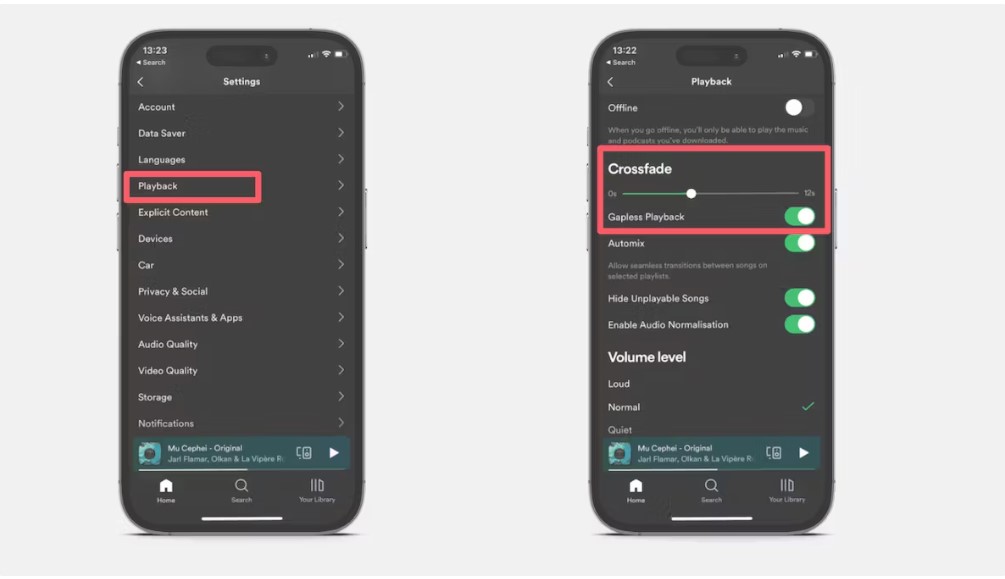
Step 3. From the settings section, click on the Playback option.
Step 4. In the Playback section, you will see a lot more options including Equalizer, Offline, Crossfade, and more. From those mentioned, click on “Crossfade” and then move the slider right below it according to how long you want the crossfading will last.
Following all the steps that were discussed in detail above will let you have Spotify crossfade songs successfully in any Spotify version you have, whether it is the desktop version or the mobile version.
Part 3. Best Songs to Crossfade on Spotify
You might have thought a lot already about the order or the arrangement of the songs in your song list, but you cannot simply avoid the fact that not all songs go well before or after another song. So, if you have a Spotify Premium subscription, this matter would not bother or worry you that much because Spotify has a feature called Crossfade which lets the users blend the tunes in your song list by no more than 12 seconds or even by a second if you would wish to. With having Spotify crossfade songs, you can literally avoid the bumping of songs and then you can even have them streamed in a very smooth manner.
I have here some of the most recommended songs that you may consider using for the Spotify crossfade songs feature.
- Erkki
- Love is lost- Hello Steve Reich Mix by James Murphy for the DFA
- Boring Angel
- Very Large Green Triangles
- Hero Brother
- Day Like This
- L’amour naissant
- Geared Piano
- Everything You’ve Done Before- Dixon Remix
- 39 Step
- Magical Boy-Matthew Herbert’s ‘Not ‘Til It Stops Mix’
- Radar Version
- Heaven- Blawan Remix
- The Bwiti InitiatePart 4. How To Get Spotify Songs Without Paying Premium Fee?
Listening to music is relaxing and good but it is much better if listened for free right? With Spotify Free, you are allowed to access your favorite songs anytime as long as you are connected to the internet but of course, with some restrictions included. So, if you want to get away from these limitations, upgrading your account to Spotify Premium would be the best idea. However, if you do not have that monthly budget to avail a Spotify Premium account, then knowing about TuneSolo Spotify Music Converter would be a great help to you. TuneSolo Spotify Music Converter is actually a music converter that is very capable of helping you experience the features and services a Premium user enjoys. Let us know more about this notable music converter, TuneSolo, by learning its major features below.
Major Features Of TuneSolo Spotify Music Converter
Convert Spotify Music to other audio formats
TuneSolo Spotify Music Converter is very capable of converting your favorite Spotify songs into any of the formats including MP3, WAV, AAC, and FLAC output format.
Download Spotify Music
Another feature of TuneSolo is its capability to download all of your most loved Spotify songs on your device. Name all the songs you want to save and TuneSolo can help you with that.
Offline playback
TuneSolo Spotify Music Converter even lets you enjoy the songs offline. Through the conversion and download feature, you can also listen to the songs offline without the need for an internet connection and a stable signal for your mobile data connection.
Fast speed of conversion
TuneSolo can actually finish the entire process in up to 5x speed of conversion. This is a lot way quicker than any other converter’s conversion speed. You can save a lot of your time since with just a few minutes to take, you can already have dozens of converted songs.
Play the songs on many devices
The audio formats mentioned a while ago are actually accessible on many devices unlike the DRM-protected original songs from Spotify. Through the help of this feature, all the users can actually play them on a lot of music players around them.
Preserves ID3 tags and Metadata info
ID3 tags and Metadata info are two important details because they are used for the identification of Spotify songs. Fortunately, TuneSolo Spotify Music Converter is very capable of retaining these details even after the process of conversion.
Free updates and help from the technical support team
If you were a user of TuneSolo Spotify Music Converter, you will be entitled to free updates whenever there is one available. You can also ask for the help and guidance of the technical support team if you encounter a problem in the middle of the process.
How to Download Spotify Music for Free
Step 1. Download And Launch TuneSolo Spotify Music Converter
The first thing that you have to do is to head to your application store and download the app from there. Another option is by visiting the official website of TuneSolo and download the app from there. Right after the complete download of the app, have it installed and running in your device as well.
Step 2. Upload The Songs Into TuneSolo Spotify Music Converter
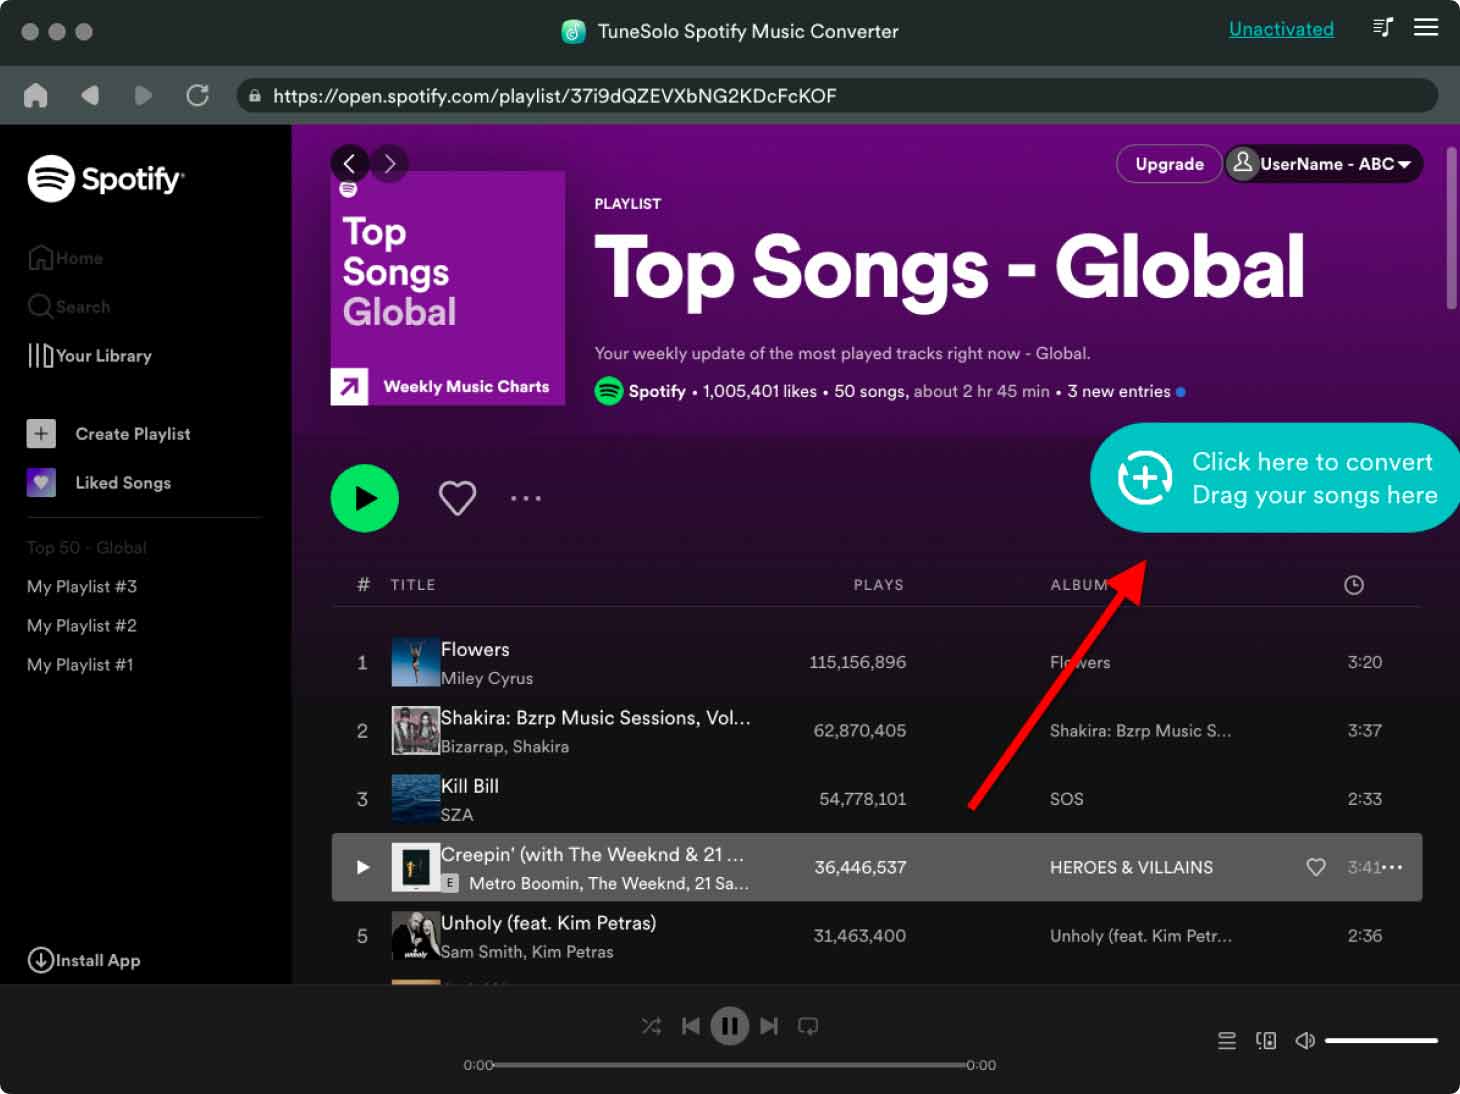
After installing the app, wait for a couple of minutes until it reads and recognizes your music library. Once done, you may now start uploading the songs into the converter. In uploading, you may just copy the link and then paste it into the area allotted for it. Another option is by dragging the song from your music library and then dropping them into the music converter.

Step 3. Choose The Output Format Of Songs And The Output Folder
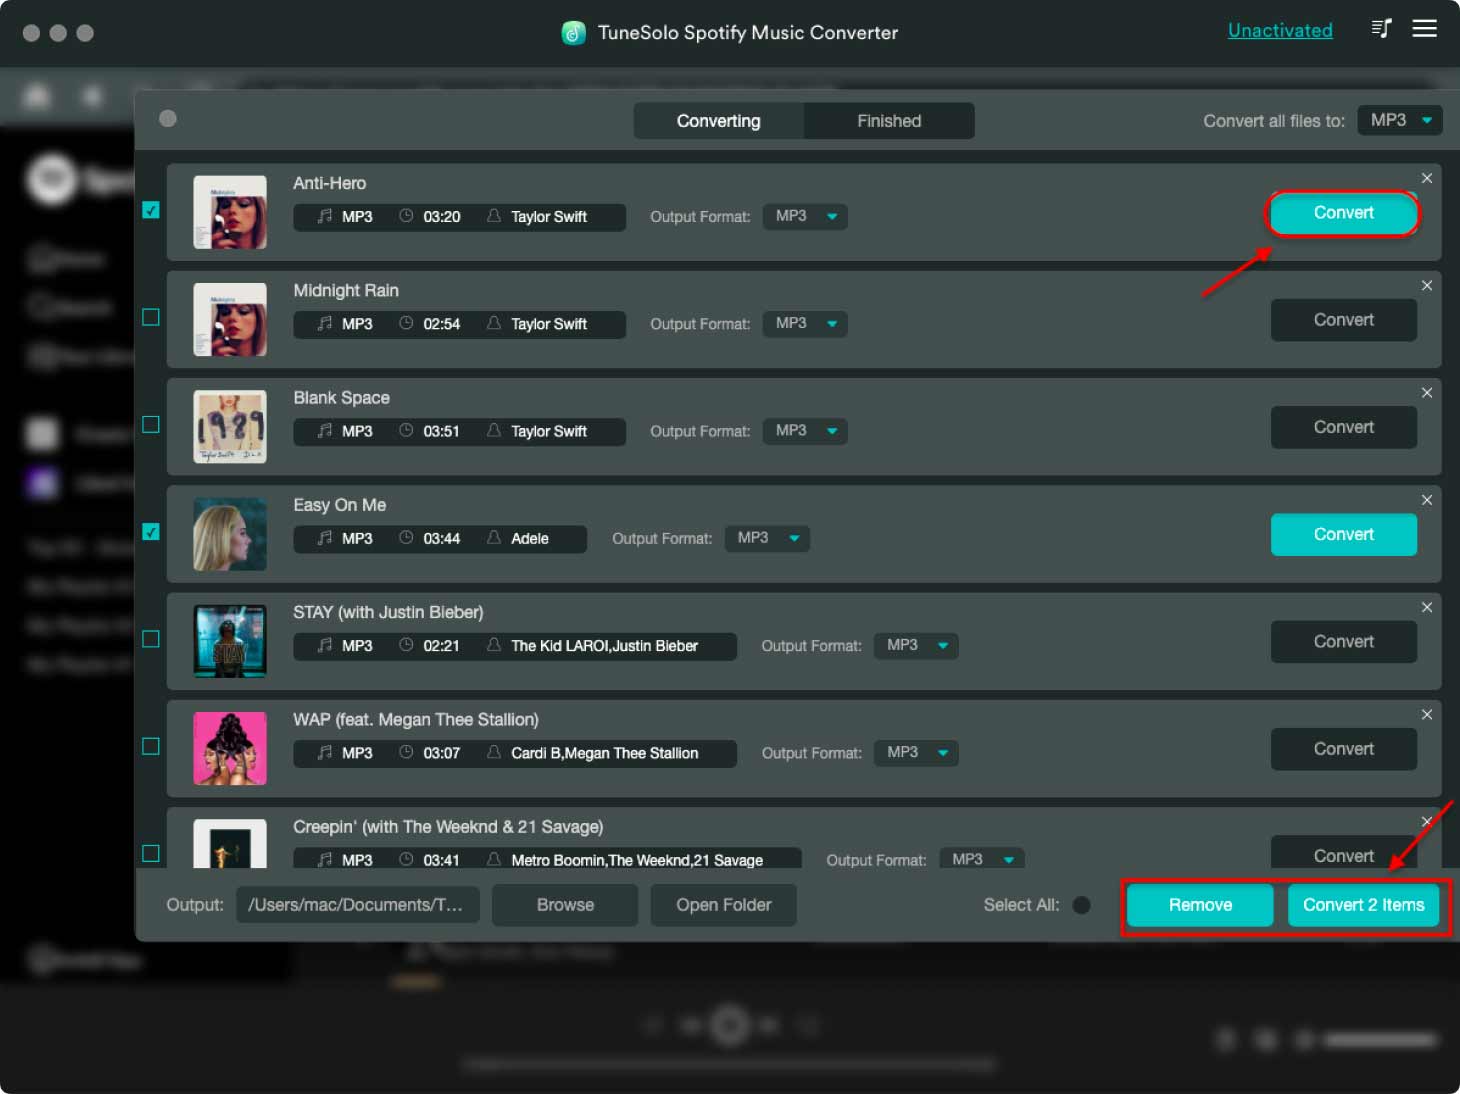
Now that the songs are already uploaded to your device, you may now start selecting the output format. You may choose from MP3, WAV, AAC, and FLAC output formats. After that, you may also choose the output folder where the converted songs are to be saved afterward.

Step 4. Click The “Convert All” Button
Once the songs are already uploaded and the output format was set already as well, you may now click the button of “Convert All” to finally have the process of conversion started.

Step 5. Get The Converted Songs
After the conversion process was done, you may now check the songs and save them directly on your device. You will find the songs by clicking the button “View Output File”.
Part 4. Summary
Spotify is capable of providing us the best music released ever is already enough reason why it is always worth it to have such a music provider. Like what was mentioned, it has a lot of features and services that are all beneficial and advantageous to many.
We can even have Spotify crossfade songs and enjoy the smooth transition of one song to another. On the other hand, it is also great to know about TuneSolo Spotify Music Converter, a remarkable tool that is perfect for having the songs downloaded on your device. TuneSolo definitely lets us enjoy the same features a Premium user enjoys.