How to Create an Apple Music Profile & Modify Sharing Settings
Apple Music has made it possible for users to share their favorite playlists with their friends and family. This has made it easier for them as well to explore other content.
If you have an Apple Music subscription, it would be best to know the detailed guidelines on how to create an Apple Music profile. In this way, it will be easier for you to create your own and share them with others. In that case, the discussion below is perfect since it is to tackle Apple Music profile problems.
Article Content How to Create Apple Music Profile?How Can I Find My Friend's Playlists in Apple Music?Bonus Tips: Share Offline Apple Music with Your Friend Easily
How to Create Apple Music Profile?
Apple Music profiles are very helpful especially if you wish to gain a lot more followers. This is very useful as well if you are planning to discover more tracks or playlists that other users have been enjoying. As you will notice, Apple Music is slowly getting the same vibe and function as other social accounts do.
Let us see how to create an Apple Music profile and how to perfectly set up one. Let us have the procedures step by step for you to understand them in an easier way.
1. How to Claim Apple Music Nickname?
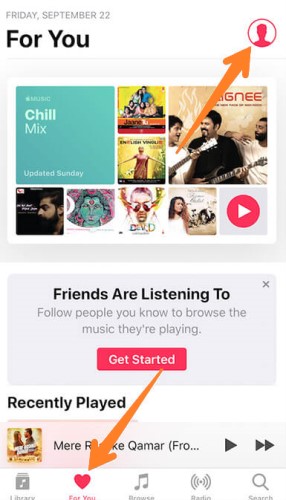
Creating your own nickname is basically a part of creating an Apple Music profile. This will serve as the main way how other users will be able to find you. To claim yours, just follow the set of steps below.
- On your used device, open the Apple Music app.
- Now, click on the For You tab and notice your avatar placed at the upper right part of the screen.
- After that, select your name and then choose Edit.
- You may now proceed to type your preferred Apple Music nickname.
- If you are already finished, select the Done button.
2. How to Add a Photo to Your Apple Music Profile?
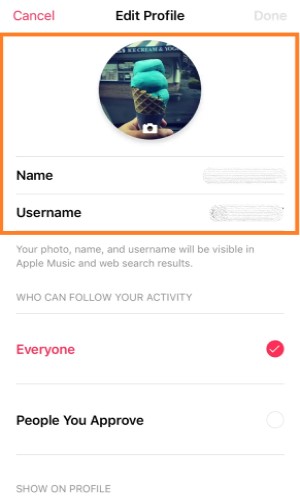
Choosing the right photo for your profile is a very important matter when you create an Apple Music profile procedure. So, to do this, see the detailed steps below.
- Again, launch the Apple Music program and then select the For You tab.
- At the upper right corner, see your avatar and then tap on your name.
- Click Edit and select your image.
- Here, you have two options. You may either take a photo of yourself or you may just select a photo from your previously saved images in your library.
- Select Choose and then click Done.
3. How to Set Up Your Apple Music Profile?
- Launch your installed Apple Music program and then click “For You”
- The next step is to click your avatar which is placed at the upper right part of the screen.
- Click your name and then choose “Start Sharing with Friends”.
- From there, you would begin setting up your account’s information.
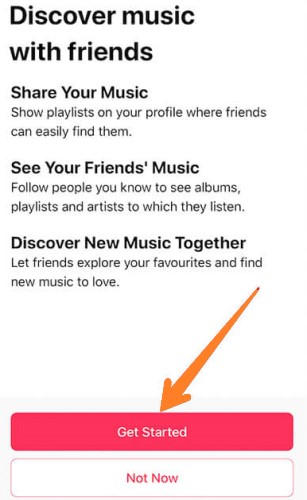
- Navigate to the “Discover Music with Friends” page and then tap on the “Get Started button that is placed at the bottom part of it.
- And then after that, navigate next to the “Help others find you” page wherein you have to choose a profile image, nickname, and username. The other way how to do this was also discussed in the previous sections above. If you are already done with setting up the needed details, just tap on the Next button.
- Now, on the “Choose who can follow you” page, you may choose from Everyone or People You Approve. Tap on the option you think would be the best choice for you. If you are already done again, click on Next.
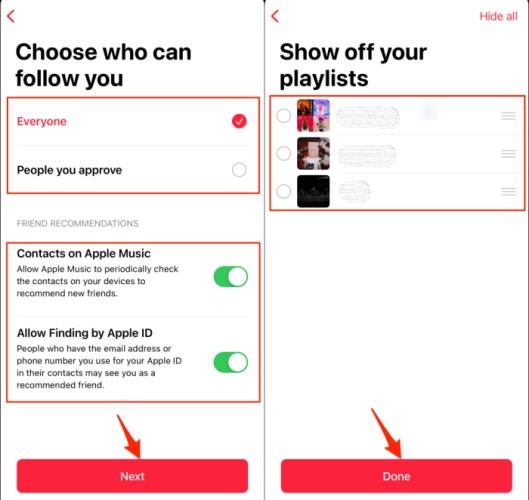
- On the page “Show off your playlists”, you are able to select those contents that you wish to share with your friends. If you will notice as well, there is a Hide All button that is placed at the upper right part of the said window. This should be clicked if you do not wish to share even a single playlist of yours with your friends. If you are already done setting it up, just click on Next.
- You can also look for more friends to follow in your profile. In this way, you will be able to explore more playlists from your friends. As you can see in this window, there is an Invite button and a Follow button. This means that you can either follow someone or invite them as you like. You also have the privilege to look for more friends, particularly through the help of some social media platforms like Facebook, Twitter, and Instagram.
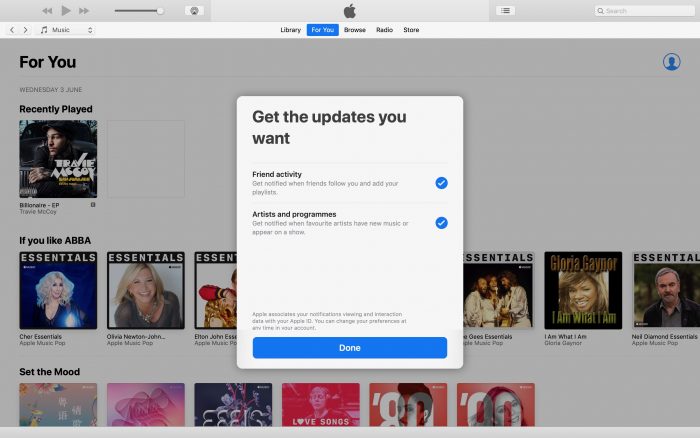
- Lastly, in the “Get the updates you want” window, you are to decide and set whether you want to get notified or not. In this window, you will see two options particularly “Friends” and “Artists and Programs”. If you wish to enable them, just switch the toggle button to green, on the other hand, if you wish to disable it, just make sure that the button was turned in the opposite way. Once you are finished, just click on the Done button that is found at the bottom part of your window.
How Can I Find My Friend's Playlists in Apple Music?
Apple keeps adding more social features in Apple Music. Since you already know how to create an Apple Music profile, let us now tackle how to land on your following friends’ curated playlists.
- The first step is to open your Apple Music app and then click on the For You tab.
- At the top right corner of your screen, you will see your avatar. Click it in order to land on your profile.
- Continue scrolling down the page until you land on the section allotted for the followers that you have made so far. You will be able to see as well those that you have been following since then.
- Choose one friend that you want and then navigate to his or her profile.
- In his/her profile, you will be able to see all of the playlists that she/he has selected for sharing with other friends.
- At the upper right part of the screen, you will see the Add button which you have to click if you wish to add it to your own music library.
This newly created feature by Apple Music has a good impact especially if you are looking for an improved connection between the users. Instead of just streaming any song or playlist that was recommended by Apple Music, it is now possible for you to share it with some of your friends as well.
Bonus Tips: Share Offline Apple Music with Your Friend Easily
What if your friend does not have a subscription to Apple Music, how are you going to share your favorite Apple Music content with them? For you to be capable of doing this, you will be required to download the songs first on your device and then proceed with transferring them to other music players or to a USB drive to easily share them with your friends.
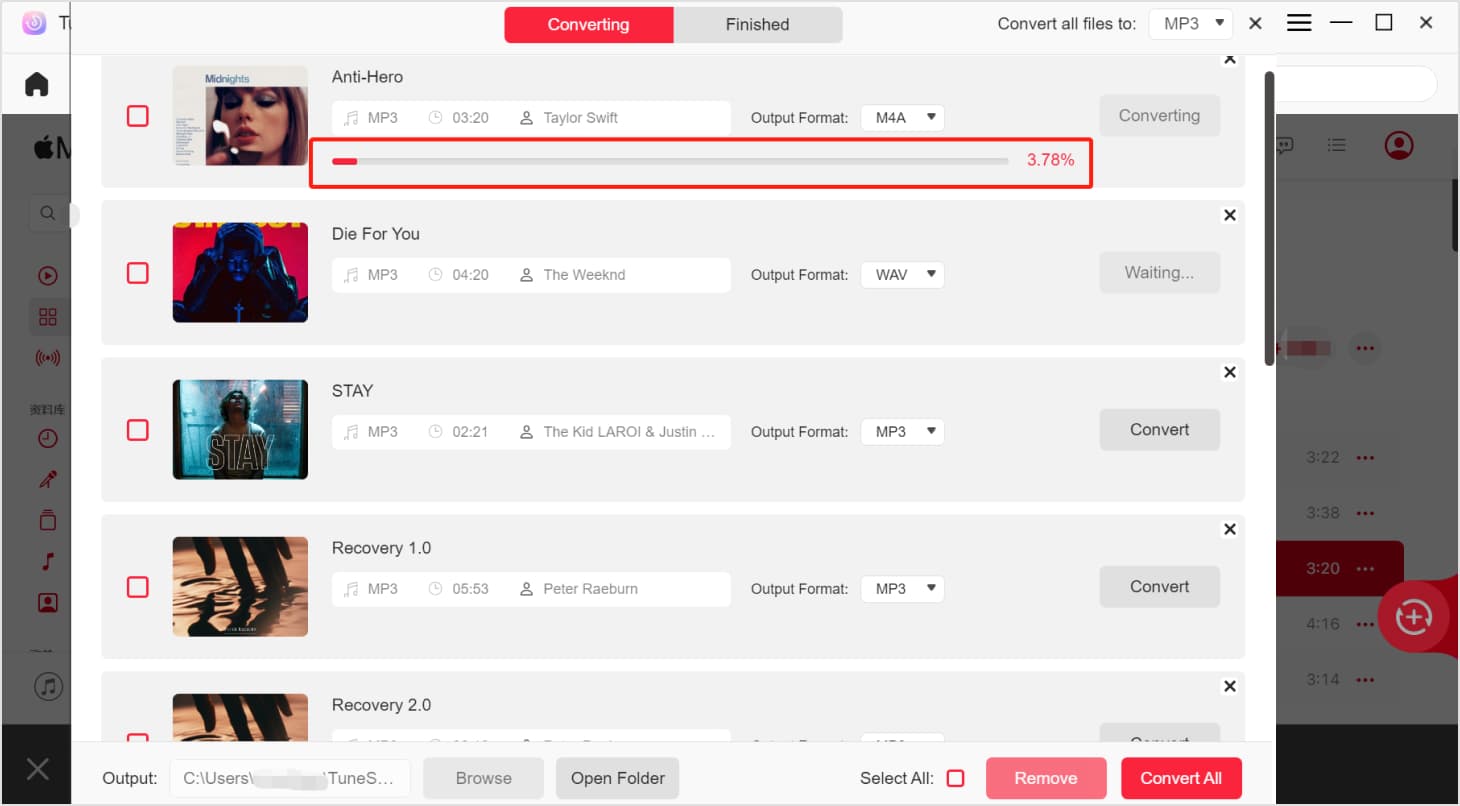
First, you will need to use a tool that is capable of removing the DRM from Apple Music songs. As you would know, the files are DRM protected, so, copying or downloading them would not be possible without the use of a professional tool. For this process, you can use TuneSolo Apple Music Converter.
This tool is not only capable of DRM removal, but it can also convert and download Apple Music songs to common output formats like MP3, M4A, FLAC, and WAV so that you can transfer them to many platforms or devices. The whole process of conversion and downloading of songs will only take up a few minutes.
TuneSolo can also give you the best audio quality of the tracks that you just converted, plus all the details that are important for the identification of songs could also be preserved even after the conversion process. And now you can share offline Apple Music songs with your friend easily.
Conclusion
In the previous sections above, we have tackled how to create and set up an Apple Music profile. I hope that the details helped you a lot in doing this procedure. On the other hand, without an Apple Music subscription, you can still be able to share Apple Music playlists with your friends through the help of TuneSolo Apple Music Converter.